A simple guide to quickly provisioning AWS resources with Ansible
Do you want to skip the AWS console to get a virtual machine (VM) up and running in minutes?
In this second part of this post series, we cover AWS infrastructure provisioning with Ansible, to automate creating the resources we need for a use case.
The overall goal is to get several cloud resources automatically provisioned and configured to deliver a reproducible Linux environment that supports a use case, which in this case is creating virtual network topologies for lab testing. This is a four-part blog post series that covers:
- Use-case description
- Automating Infrastructure Provisioning
- Delivering an Application Deployment Environment
- Releasing Cloud resources

Target setup
While we only provision a single VM (EC2 instance) with Internet access in this example, there are several AWS resources that are prerequisite to launch it, primarily:
- SSH Key pair
- Virtual Private Cloud (VPC)
- Security group
- Subnet
- Internet gateway
- Route table
Let’s look at how to provision these resources in concert to launch a VM. Most of the tasks presented here are taken from the Ansible Workshop Provisioner. Kudos to all the contributors. The following is a diagram of the target setup.
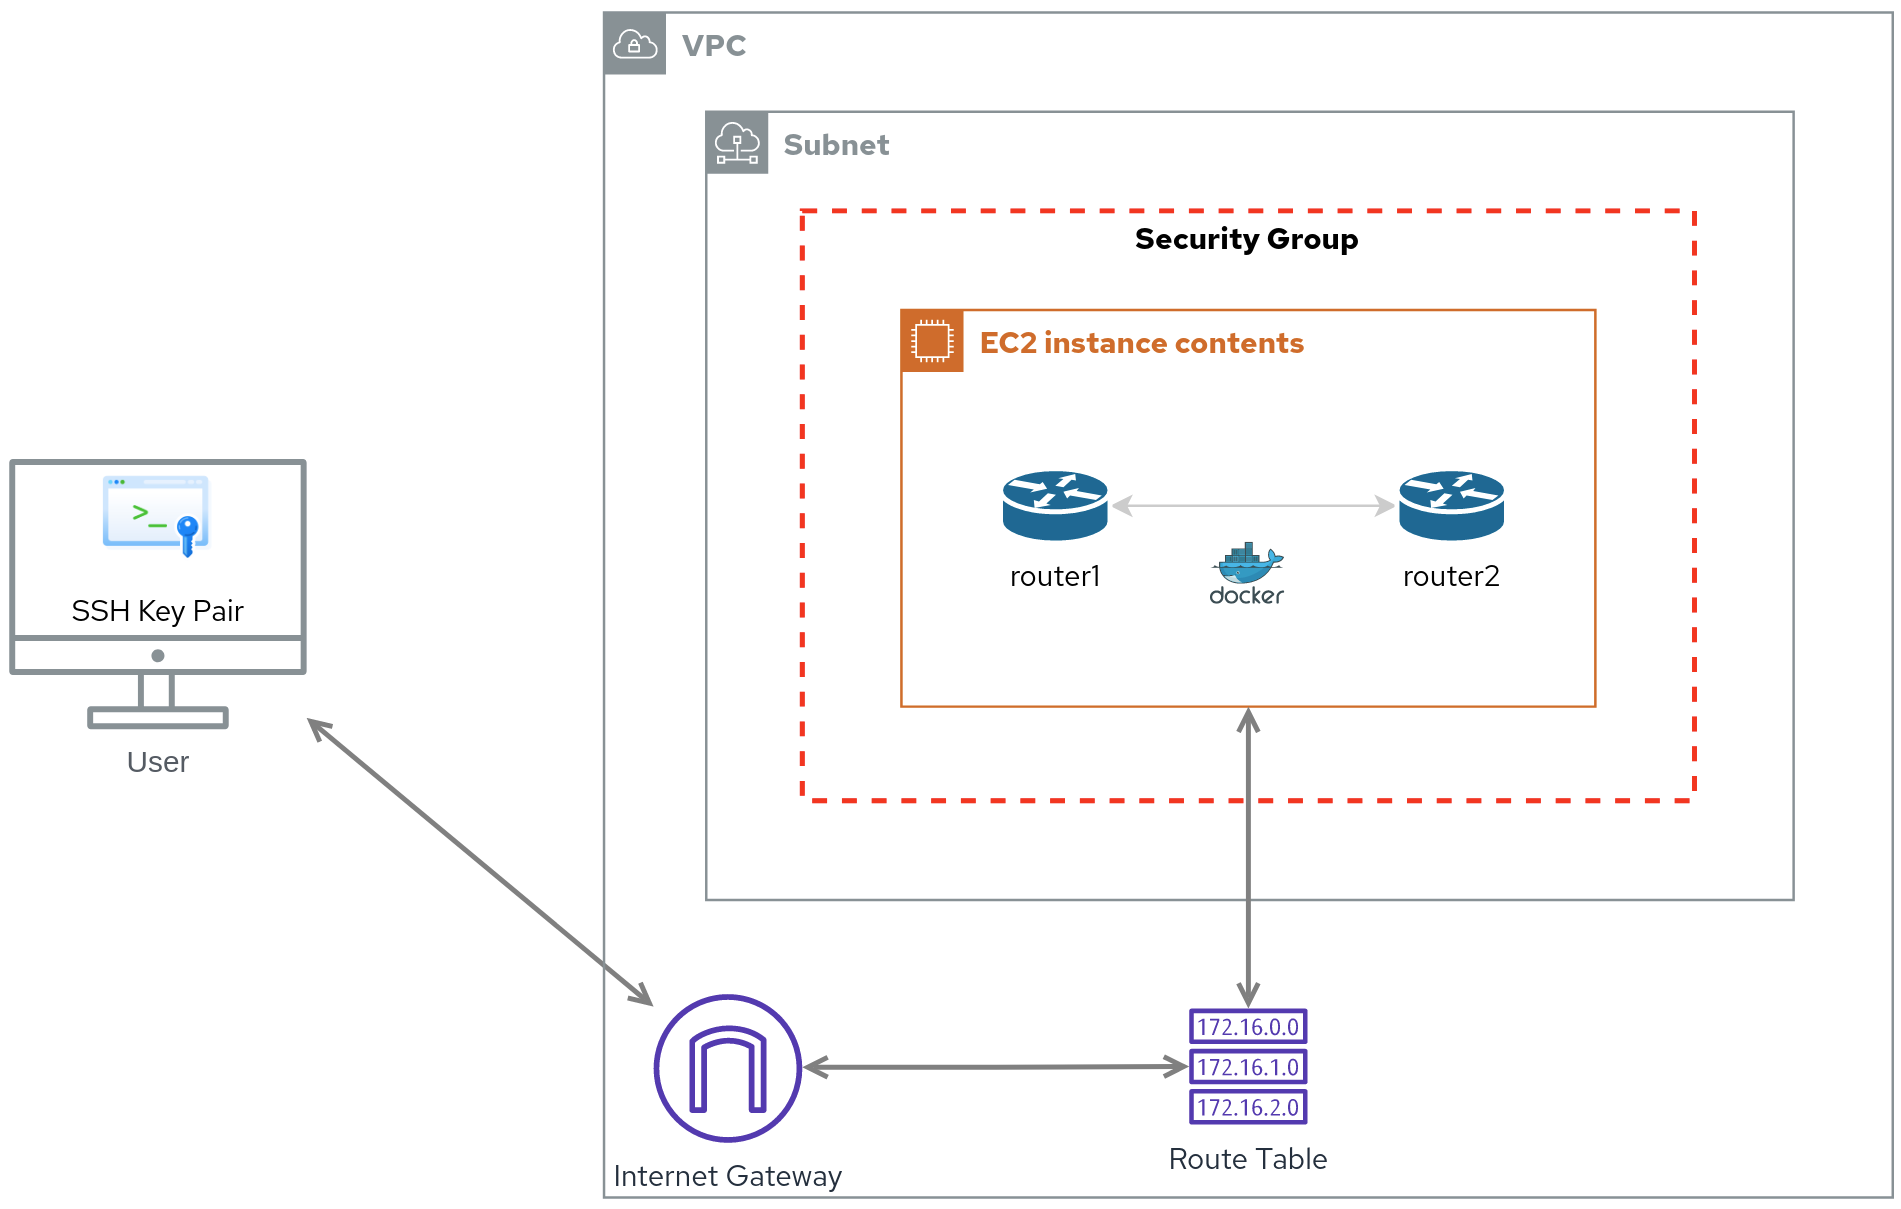
In a nutshell, an EC2 instance lives in a Subnet of a VPC. Its traffic is routed via a Route table to an Internet gateway and it is firewalled by a Security group. You can connect to this instance using an SSH Key pair.
If you don’t have an AWS account already, you can get one for free to run this example. In case you have an expired Free Tier account, you can use “email+nonce” to keep using Free Tier with the same email multiple times (credits for this tip go to Michael Kashin).
Initial variables
A couple of AWS-related variables are pre-defined in the vars folder of the repo. They all come with pre-defined default values.
- The AWS region where to provision the resources is specified in the variable
ec2_region. Its default value isus-east-1. - A string to prefix the name of any AWS resource provisioned is defined in the variable
ec2_resource_prefix. Its default value istestbed. This is key to identify these resources and terminate them after we are done with them.
Resource provisioning
All the AWS resources listed are only created if they don’t exist already. This is achieved by using Ansible modules that are idempotent.
Idempotency: An operation is idempotent if the result of performing it once is exactly the same as the result of performing it repeatedly without any intervening actions. [Ansible Glossary]
SSH Key Pair
An SSH public and a private key(pair) are required to use as credentials to connect to an EC2 instance.
We create the key pair with the ec2_key Ansible module. The name of the key pair is prefixed with one of the initial variables (ec2_resource_prefix). The output of the tasks is saved in memory in the variable create_key. This variable is not only referenced in the next task, but also comes in handy when finally creating the EC2 instance.
The private key is locally saved to a file (<ec2_resource_prefix>-private.pem) where the Playbook is running from, to use it to connect to the EC2 instance later on.
VPC
An EC2 instance lives in a logically isolated virtual network or VPC. By default, 172.16.0.0/16 is the IP address block selected for the VPC (in the variable ec2_cidr_block). You can overwrite this value — using Ansible Variable Precedence — with any block from the private IPv4 address ranges as specified in RFC 1918.
The Ansible module ec2_vpc_net handles the VPC creation. The output of the task is stored in a variable named create_vpc.
This and the following resources get a tag with name Environment and value given by the variableec2_environment, which by default is equal to the value of the previously defined variable ec2_resource_prefix. This tag helps identify these resources when the time to delete them comes.
Security Group
A security group filters inbound and outbound traffic to EC2 instances, hence its rules are use-case specific.
The Ansible module ec2_group helps here with the Security Group definition. The VPC ID (vpc_id) from the previous task (create_vpc) is referenced. As for the firewall rules, it only allows inbound SSH traffic (port 22) from any destination (0.0.0.0/0) and allows any outbound traffic. You can be as granular as you want to, here.
Subnet
A subnet from the VPC CIDR is dedicated as the public subnet (variable ec2_subnet), to connect EC2 instances to the Internet. The default value is 172.16.0.0/24.
The Ansible module ec2_vpc_subnet creates the subnet. The output of the task is stored in the variable create_subnet to access subnet information in a subsequent task.
Internet Gateway
To enable internet access to EC2 instances, we need to create an internet gateway and attach it to our VPC.
The Ansible module ec2_vpc_igw does the work here. We end up with an internet gateway and its details are directed to the variable igw.
Route Table
The traffic of the subnet created is routed to the internet gateway via a route table defined in this task.
We put all the pieces together with the Ansible module ec2_vpc_route_table, by creating a route table in the VPC (create_vpc.vpc.id), with the subnet (create_subnet.subnet.id) and a default route (0.0.0.0/0) pointing to the internet gateway (igw.gateway_id).
EC2 Instance creation
With all the previous resources in place, we can finally launch our VM. You can select the Linux distribution to be either Fedora (the default) or Ubuntu. This will not only determine the AWS AMI to use (ec2_ami_id), but also the corresponding ec2_username for either image.
We point to the ID’s of the previously created resources in the attribute definition of the Ansible module ec2_instance.
Now, the number of vCPU’s and memory for this instance are determined by the instance_type variable. By default it selects t2.micro, i.e. 1 vCPU and 1 GiB of RAM for $0.0116 an hour (free with a Free Tier account). For details on instance types and prices, check out On-Demand Plans for Amazon EC2.
If you need a bit more horsepower, let’s say 2 vCPU and 8GiB of RAM, you can go with an m5.large instance: ansible-playbook create-EC2-testbed.yml -v — extra-vars “instance_type=m5.large”.
Finally, before we move to the configuration section (covered in the next post), we need to take care of a couple of things.
Verify connectivity
We first validate we can actually SSH to the instance.
Add VM to an inventory
Then add the VM to an Ansible inventory we can refer to in the configuration section.
Conclusions
With a few concise Ansible tasks, you can consistently provision a VM and all resources to support it in a matter of a couple of minutes.
In the next post, we go through the details of how we autoconfigure the VM we just created. Stay tuned!
